Main
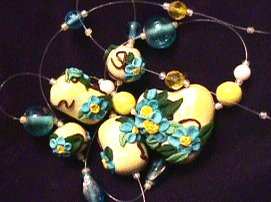
Sculptured Flower Beads
|
Sweet Forget-Me-Nots... in any color you can imagine...
|
|
|
So delicate and intricate looking! I wanted to write a project for my beginning FIMO classes that would look "attainable," and yet not so easy that it would bore even the more experienced students.
|
They all loved this
illusion necklace, and one of the girls who took that class came to the next one with beads that she'd made like this!
That kind of thing just makes my day! :-) One of the best things about writing all these handouts for my classes is that I've learned a lot more in two weeks about Paint Shop Pro than I did in the entire year since I bought it. The illustration below was drawn, painted and edited for the web entirely in PSP... with a mouse! When I get a PenPartner, this kind of work will seem like a walk in the park! :o)
Okay, on to the lesson.... you'll
need some prebaked bead bases in a marbled mix of white and some other pale color, unless you want pale flowers
on a darker background... pick what YOU like. |
|
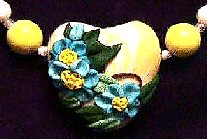
Make the bases in a variety of shapes... barrels, rounds, tubes,
hearts, in the 3/8" to 1" size range. You'll need extremely small amounts of colors for your flowers and leaves...
I mixed these up with several shades of aqua, several shades of bright yellow and orange for the centers, and
several shades of green for the leaves. You can also add swirly threads of a "vine" color... I used a warm brown.
You'll need diluent and a small flat or filbert brush to apply it, some toothpicks and a big lump of scrap clay. After you
bake the bases, sand them a little with automotive sandpaper starting with
400 or 600 grit and working up to 1200 or more.
|
Just a few light swipes with each grade in each area is probably all you'll need. Then buff the beads with a wheel, or on your jeans or mousepad. They should look good, to start with. Now, poke them onto toothpicks and stand them in a lump of scrap clay. Paint them with diluent and let them sit while you get the rest of the materials ready. They'll need another coat of diluent in half an hour or so. Prepare a toothpick by cutting off one sharp end and sanding that end round. Slightly blunt the pointed end and smooth the whole thing with a fine grade of sandpaper. Wet it with diluent and bake it. Sand it with a high grade paper, (1200 or more) get it wet with diluent, and bake it again. Twenty minutes each time, at 275F. A light buffing on your jeans will have this ready to use as a sculpting tool. |
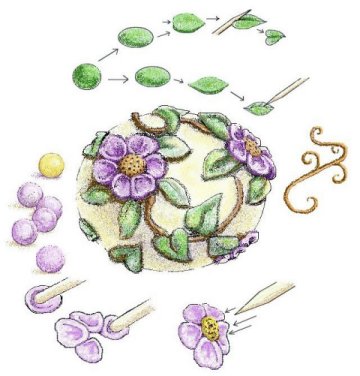
| Now, your colors. You'lll need five or six leeeetle teeeeny balls of flower color for each flower, one ball of yellow, and about seven to nine leaves for every flower. About halfway though this prep, you'll need to put that second coat of diluent onto the baked bead base. For the petals and centers, leave the clay in ball shapes. For the leaves, make two different kinds, both go from a "ball" to a "football" shape, but one, you exaggerate the pointy ends and the other, you flatten one end and make the other pointy. Both types of leaves you detail with the pointed end of your toothpick... they look fine with just one crease down the middle, or you can add side veins after you put them on the bead, if you like. Roll tiny little threads for "vines," half an inch or an inch long. You'll need two or three for a bead that's in the 1/2" size. Okay, all that's ready... pick up a skewered toothpick and brush one more time with diluent... the brush should be nearly dry, but there'll be enough diluent on it to help stick new clay to baked. It's softening the outer layer of cured clay. I use diluent between any two pieces I am trying to attach, baked or not. I read that on a newsgroup posting, once, and since I started doing that, I've noticed a big difference... my parts don't fall off, any more! :-) Okay, now with the pointy end of your toothpick, pick up one of the vines, and drape it on the bead... push it around a bit with the toothpick until it looks pretty. Decide where the first flower is going to go, and use the toothpick as a tiny brayer to roll the clay firmly onto the bead at that spot. Use the minimum pressure that will make the clay stick on the other parts of the vine. If the vine slips and slides all over, set the bead aside for a bit, until the excess diluent is absorbed, or remove the vine, wipe the bead off and start over. Certain browns will "bleed" if there is too much diluent on the surface. At the place you decided the first bead would go, apply some leaves to the vine, leaving room in the midst of them for the flower. The leaves can face in all directions... I try not to let them look alike... some can tilt up at the ends, some can curl under. In the "clearing" you've left for the flower, leave a space in the middle to put in the flower center, last and off to one side of that, (see bottom of illustration, above) apply the diluent in a small spot with a nearly dry brush, and put down one "petal" ball. | Smoosh it a little, but not all the way flat.
Use the rounded end of your toothpick to make the side of the petal
nearest the center into a "cup" shape, rolling the outside edges rather flattish. Continuing to the
adjacent point on the imaginary circle, apply the next petal alongside the first, pushing it up against
the other petal. Before each petal, use the diluent in miniscule amounts. Change colors lighter or
darker, now, and do the next three or four petals.
When those are all applied, put your little "center" ball in the middle of the petals and flatten it slightly. Use the pointed end of the toothpick to texture the center *and* make a better contact between the raw and baked clay, by poking the center ball repeatedly. You can elongate one petal and roll it into a "bud" shape, too, if you want to. Now, do some more vines and leaves and flowers wherever you want them on the bead. You can lay the vines out in precise "equators" and use a regular pattern, or you can be random in your placement. When it's done, stick it in the scrap clay and go on to the next bead. When you're done with the last one, it's a good idea to let them sit long enough for that last bead to absorb the extra diluent... ten or twenty minutes, maybe? I really do like using that stuff, cause I really do like my parts staying put. :-) After curing, I had a really nice glow from the buffing on the bead itself, and a matte look to the flowers, which I liked, so I didn't glaze them. (This is pretty amazing, 'cause I normally Flecto *everything* that sits still!) I'm rarely happy with my work, but, I really do like how these turned out. Hope you enjoyed this little lesson, and that it makes you want to go play with clay.... If you make some of these, I would love to know where you have them posted. Email me to give me the URL. I'd like to post them, here, too. |

Actual Size
Main
![]()
![]() Great Starts
Great Starts ![]()
![]() Links
Links
![]()
![]() Gallery
Gallery ![]()
© Elizabeth Campbell 1999 - 2004