Covering Pens with Polymer Clay, Page 3
<----Pens, Page 1![]() <----Pens, Page 2
<----Pens, Page 2
Main
![]()
![]() Great Starts
Great Starts ![]()
![]() Links
Links
![]()
![]() Gallery
Gallery
Easy carving and backfilling
and some pen stands.
|
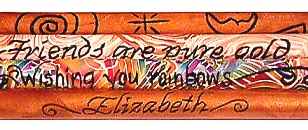
Do people snitch your pens? Or
maybe you'd just like to make a special gift for a friend. This is a really fun
thing to do with many
different surfaces... a little difficult with a curved one like pens, but the
results can be stunning...
especially if you take your time and don't rush it, like I have for these
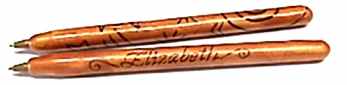
projects, here. *g* Start with pens
that are already cured and at least roughly sanded.
|
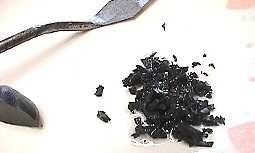
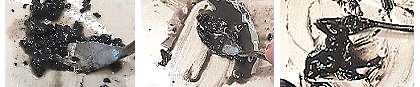
While you get your other supplies together, start some "grout" to soaking. Chop up about 2 teaspoons of black clay very fine and drip about 20-30 drops of liquid diluent onto it. Let it soak for a while. You can also chop up the clay, put it in a small "cubby" container and seal it up with the diluent for a few weeks, and it'll be nearly ready to use. |
|
Easiest with a palette knife like this.... just keep smooshing and mixing the
diluent into the clay.
I like these little 2 oz "cubby" containers to store "grout" and other clay supplies in. |
|

|
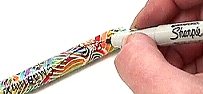
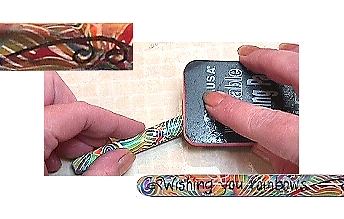
Use a fine-point Sharpie to draw
your design or lettering. Any mistakes will get sanded off, later. This is just
a guideline.
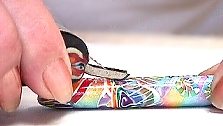
I've got two different sizes of linoleum cutter tips, here... I'll use the broader "v-cutter" because the colors I'm working on are so vivid that a fine line would get lost in the busy pattern on the pen. You can also buy Dockyard carving tools which are wonderful for this type of work. |
|
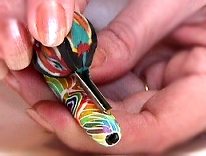
It takes a slow, steady pressure
to make smooth cuts. I have to admit that I get too hasty with this and it
shows up in little "jaggies"
in the lines that I would prefer to be smooth and even. The deeper you cut into the
clay, the wider the line will be, so learning to use even pressure is important, too.
Especially around curves, it's important to not let the carver slip away from you. You have to use a controlled pressure to get smooth curves. |
|
|
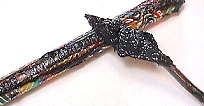
You can see how difficult it is
to "see where you're going" with this busy a pattern and the sketch lines
mostly carved away. You're
kind of flying blind, and unless you are meticulously careful, (which I
definitely am *not!* :-) you won't know exactly what your
design will look like until it's all filled and sanded.
|
|
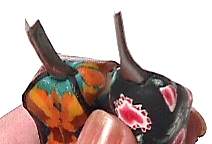
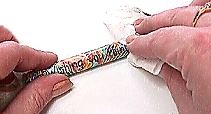
They're pretty ugly, right out of the oven. *g* Just gonna take a lil sandpaper and buffing
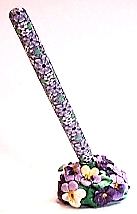
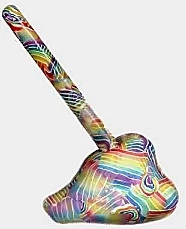
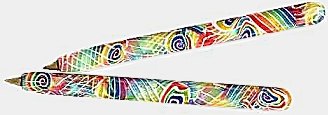
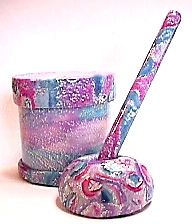
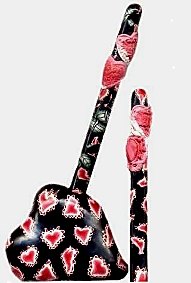
to make them pretty, again. I love these little sanding sponges... the medium grit is rough enough to take all the excess off, and the fine and super-fine are great for getting the surface ready to buff. The four at the bottom are sanded and buffed, and you can see the different effects from the wide to the narrow cutter. It also appears that the look is most effective with simple lines on simple backgrounds. You can make a simple stand by covering a lump of scrap clay with something fun. If the pen doesn't stand at too much of an angle, it won't cause your stand to tip over... the more vertical the pen is standing in the holder, the smaller the diameter of the base you can get away with.
|

|
|
I use premade canes for my store demonstrations for AMACO. I matched the colors in one of the canes exactly to
make a base covered with flowers and leaves. Those are made from AMACO molds made by Judi Maddigan.
|
|
The free-form heart shape is kind of fun. This one is scrap clay covered with white, then silver leaf, then slices
of canes made from the translucent rainbows.
|